2011年8月31日星期三

Side wall vents

Side wall vents
Side wall vents are designed to direct airflow in one or two directions. They maybe used in either a supply or return air application and can be installed in ceilings or walls. It is a great option for filling your remodeling or building needs. Made of solid wood from domestic and exotic, these vents give warmth to your home. These wall mounted vents can be also used as speaker grilles, lighting grilles or for other decorative architectural applications.
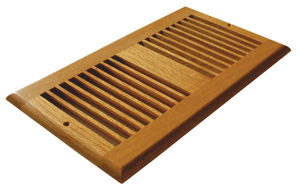
Side wall vents, wood wall vents, air vents, wall registers, wall grills, wall diffusers, manufacturer, supplier
Specifications  2x10", 2x12", 2x14"3x10", 3x12", 3x14"  
4x10", 4x12", 4x14"6x10", 6x12", 6x14"
Custom sizes are available upon request.
Species  Red oak, White oak, Maple, Cherry, Walnut,  Hickory,
Beech, Birch, Brazilian cherry, Santos Mahogany
Finishes  Clear finished and Unfinished

2011年8月23日星期二

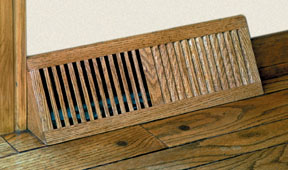
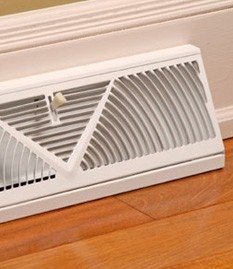
Pictures of Baseboard diffuser

There are many different types of baseboard diffuser, louvered shaped, fan shaped, egg crate shaped. They could be made of hardwood, MDF, metal and plastic. While the most popular one is hardwood louvered baseboard diffuser.
Baseboard Diffuser                  
Airflow Breeze baseboard register vent booster fan.
                    Baseboard

2011年8月18日星期四

How to Replace a Ceiling Vent Cover

Ceiling vents are where heated or air-conditioned air are pumped into the home. They generally are made of metal and last for years without trouble. However if the vents are opened and closed a lot, they can wear out. If the humidity is high in the area, they can rust. If this has happened, the vents should be replaced with new ones that look good and function properly.
  • Take down the old ceiling vent, using a screwdriver. Generally the screws will require a flathead driver, but check to make sure before you get started. Unscrew the vent by turning the driver counterclockwise. Set the screws aside for later use.
  • Measure the hole in the ceiling as well as the vent cover. Take these dimensions with you to a home improvement store. Select new vents that are the same or larger in dimension. Check the back side of the vent cover to ensure that any interior working will fit the measurements of the hole in the ceiling.
  • Place the vent up to the ceiling and put it over the hole. Use the screws you removed, or new ones if you prefer, to attach it to the ceiling. If it is a bigger vent, you will need to drill into the drywall to create new holes. Once new holes are created, tap drywall anchors into the holes, and place the vent back over top. Drill the screws into the anchors. There is no need to fill the old holes, as they will be covered by the vent.

2011年8月16日星期二

Install a Ceiling Vent in a Bathroom

Proper airflow to and from a bathroom is crucial to the unending fight against mold and mildew formation. Steam in a bathroom raises the humidity, a condition in which mold and mildew flourish. An external vent will allow moist air to escape the bathroom before the moisture in the air condenses and begins to drip. Besides mold, excess bathroom moisture may warp doors, peel paint, or cause loss of adhesion to wallpaper. Several types of vents are on the market and installation details vary. However, generally the process is the same for all types.
Open the vent kit and remove the template for the hole required through the ceiling. Use a stud sensor to locate a ceiling joist as the vent housing will need to be connected to one. Mark the outline of the hole to be cut. If there is no template, note the location of the stud, and hold the housing up to the ceiling to trace it.
  • Cut out the opening along the line marked earlier with a drywall saw or other appropriate cutting tool. Be sure when cutting that the drywall doesn't crack or break and leave a jagged appearance.
  •  Insert the vent housing into the newly cut opening. The kit will likely include fasteners for securing the housing to the joist.
  • Attach the vent unit to the housing following the manufacturer's instructions exactly. Fasten the vent grill over the main vent body.
  • Enter the attic or ceiling area. To the attic-facing end of the vent, attach flexible duct material, usually made from plastic and made in an accordion fashion. Pliers may be required to get it in place and attached easily.
  • Clamp the other end of the ducting to the nearest soffit vent and allow the vented inside air to dispel under-the-roof overhang. This will eliminate the need for a separate external vent.

2011年8月15日星期一

Easy Ways to Stop the Air Flow From a Ceiling Air Diffuser

A ceiling air diffuser will sometimes leak air even when it is closed. A magnetic vent cover will seal around the opening of the air diffuser to stop unwanted air flow. You will save money when you install a magnetic vent cover in a room you do not want to heat. The magnetic vent covers come in different sizes, such as 8 inch-by-24 inch, 8 inch-by-32 inch and 24 inch-by-30 inch. The covers can be cut to fit a custom size air diffuser.

 Measure the length and width of the air diffuser. Purchase the size needed at your local hardware store. If the hardware store does not carry the size you need, get the next size up.

Remove the air diffuser from the packaging. If necessary, transfer your measurements onto the magnetic ventcover. Using a straight edge, draw a straight line indicating the desired measurement.

Cut the magnetic vent cover, using scissors or a utility knife, on the measured lines. Place the magnetic vent cover over the air diffuser. The magnetic vent cover will seal around the air diffuser.

2011年8月11日星期四

How to Open & Close Ceiling Air Vents

Sometimes, in the midst of summer or winter, a room can be too cold or too hot relative to the rest of the house. You can prevent the heat or air conditioning from making the temperature too extreme in one area of the house or office by adjusting the ceiling vent. Closing the vent will block all air from coming through and opening it will allow the air to pass through again; the degree to which the vent is open or shut can be adjusted midway to allow some heat or air conditioning to flow through. This lets you control the temperature in one area without changing the thermostat temperature.
Place a stool or ladder under the vent you want to adjust. Put the ladder or stool are in a locked position if possible, to prevent it from collapsing.
Step up on the ladder or stool until you can comfortably reach the vent.
Locate the dial or switch on the vent. If it is a square or round vent, a dial is located in the center. If it is a rectangular vent, a switch is located on either the right or left side of it.
Turn the dial on the square or round vent to the right to open the vent. Turn it to the left to close the vent. If it is a rectangular vent, move the switch up or down to open or close it.